A common task I run into with clients is setting up the scaling policies for an ECS Cluster. Users typically understand the concept of auto-scaling in AWS, but when it comes to an ECS cluster there are two things to consider when scaling.
- The resources available in the EC2 instances that make up the ECS cluster. This would be the CPU, memory, etc. that are provided by an EC2 instance type (e.g. c4.large).
- The resources needed by a container to run. This is defined by a Task definition in ECS and includes the CPU units and memory that can be assigned to a container for it to utilize.
While these two seem similar, they are independent when it comes to scaling effectively in ECS.
The question I often get is this: "I want to be able to scale my containers up and down without worrying about the capacity in the cluster. How do I set all of this up?"
This blog is the first of a series where I'll walk you through setting up a cluster that can scale its containers and the ECS Cluster it is using.
To implement this solution, we will use the following in services in AWS:
- ECS
- EC2 Auto Scaling
- ECS Service Auto Scaling
- CloudWatch
I'll assume a knowledge of ECS and Auto Scaling in this blog, but if you are unfamiliar with the service AWS has some excellent documentation on working with the service at http://docs.aws.amazon.com/AmazonECS/latest/developerguide/Welcome.html . I would recommend going through the "Getting Started" section, as it does a good job of explaining ECS and container management. If you need some more information on EC2 Auto Scaling, see the docs at http://docs.aws.amazon.com/autoscaling/latest/userguide/WhatIsAutoScaling.html .
Environment Description
To set the stage for the exercise we will work with the environment described below.
There is a running ECS Cluster running named 'Sample WebApp'.
This cluster uses an EC2 Auto-Scaling group named 'sample-webapp-ec2-cluster'. The auto-scaling group is configured to use a t2.micro with a minimum of 1 instance and a maximum of 4. The 'desired' instances is set to 2.
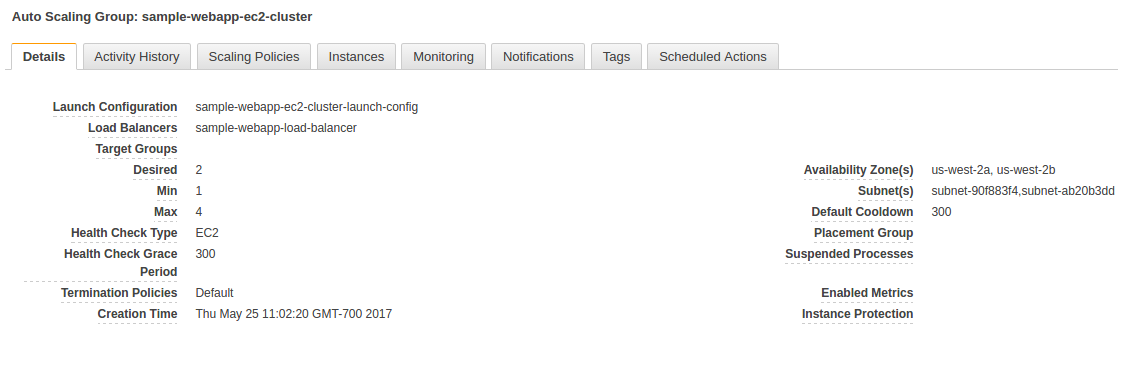
The ECS Cluster has defined an ECS service named 'sample-webapp-ecs-service'. This service is configured to run one task (container) from a task definition (a.k.a. container definition) that requires a container named 'sample-webapp'. This task definition has been configured to require a container to have 10 CPU units assigned to it.
.png)
.png)
It is important to note that this setup will use a 1-to-1 mapping of ports from the container. This means, essentially, that we can only run one container per instance. We will not go into multiple Target Groups with Application Load Balancers in this post as this exercise is meant to simply show the scaling setup in action.
Configuring CloudWatch Alarms to Provide the Scaling Triggers
In order to scale your containers, the first thing we need is a mechanism to tell ECS when to scale up or down the number of containers in your ECS service. This is handled by CloudWatch, and you can scale on any metric you choose. The two most common ones to use are the ECS Service CPUUtilization or MemoryUtilization metric. In practice, it could be one of these two metrics or a custom metric you are reporting to CloudWatch. The key is that you have a metric that provides you with the correct information about your container performance, and can identify if you need more or less containers to handle requests effectively.
Through load testing, we have determined that this environment begins to suffer when the ECS Service is reporting an 80% CPUUtilization metric.
It is very important to note that the metric you are working with is for the Service and not the Cluster. When selecting the metric, ensure that you are looking in the 'ClusterName, ServiceName' section of the ECS namespace.
.png)
Create a CloudWatch Alarm to fire off if the CPUUtilization of the 'sample-webapp-ecs-service' exceeds 80% for 5 consecutive periods:
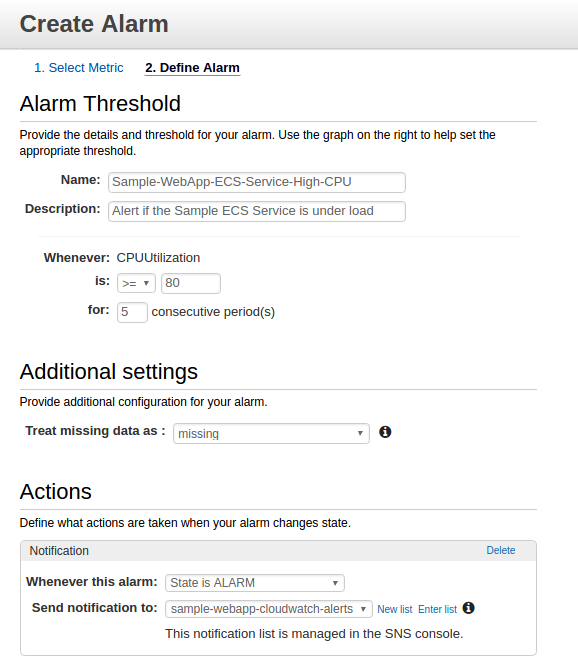
You may or may not want to know if this alarm has fired off in your environment. I always tell clients to at least setup an email notification that the alarm has triggered so that if anything occurs you have an idea of what is happening in the environment. Configure the Alarm to send a notification to a SNS topic when the Alarm is in the ALARM state. Optionally, you could also send a notification to the same topic if the Alarm is in the OK state.
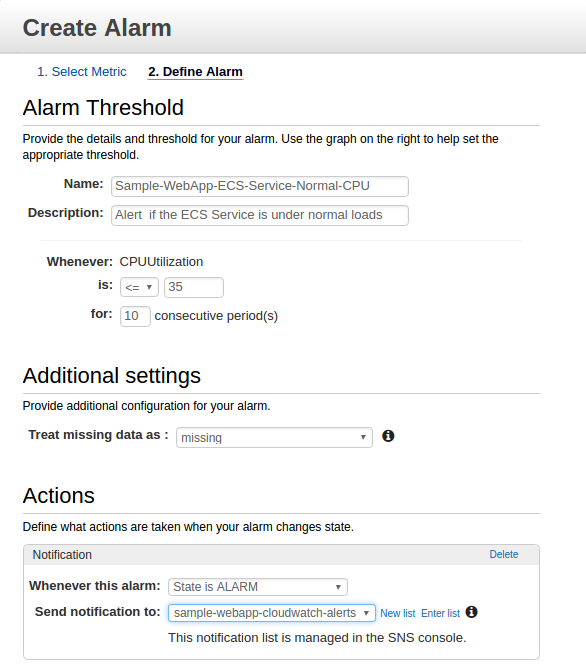
Next, we need to have an Alarm that also tells us that the ECS Service is operating within our normal performance measurements so that we know when our ECS Service is not under heavy loads. Let's set an Alarm for when the ECS Service 'sample-webapp-ecs-service' is running at or below 35% CPU Utilization for over 10 consecutive periods. In practice, I have found that it safer to have a longer period of inactivity to scale down the cluster. This ensures I do not scale down, then scale up, and then scale down unnecessarily.
Configuring ECS Service Auto Scaling
AWS offers Application Auto-Scaling which allows you to scale your containers inside of a cluster. In ECS, Application Auto Scaling is also known as ECS Service Auto Scaling. This feature allows you to add or remove containers based on how those containers are consuming their resources assigned to them across the entire ECS Service.
It is important to note that ECS Service Auto Scaling is not EC2 Auto Scaling. We are not adding in more instances to the ECS Cluster (that will be covered in the next blog), but instead we are adding/ removing the containers within the ECS Service. I usually use the following analogy:
"The ECS Cluster is two five-gallon buckets. The ECS Service is assigned a color. The containers are balls that match their ECS Service color. There can be varying colors and size of the balls. The capacity of the ECS Cluster is an area where the different balls can be placed into the bucket. Application Auto Scaling in ECS is equivalent to adding/ removing the balls of a service in the buckets."
To start configuring the Service Auto Scaling, let us go to our ECS service named 'sample-webapp-ecs-service'. In this service, select the Auto Scaling Tab. Click the blue 'Update' button for the service near the top right of the page and you will be taken to a page similar to this:
.png)
In the 'Update Service' page, you can edit your task definition, number of tasks to run, and other service fields.
A little tip to help out ECS clusters with rolling container deployments: Set your 'Minimum healthy percent' value to 50. This will then allow the ECS service to stop containers if you are not scaling up/ down to push new ones out if you update your task definition. This is not done in this exercise, but it is good to know where to set for your larger deployments.
Click the 'Configure Service Auto Scaling' button. You will see two radio buttons. Select the one that says 'Configure Service Auto Scaling to adjust your service's desired count'. That will reveal additional fields to edit. We always want to have at least 1 task running, so set the minimum number of tasks to 1. Set the desired number of tasks to 1. For this exercise right now, set the maximum number of tasks to 2.
The IAM role for Service Auto Scaling value needs to have permissions to perform the scaling of the service. The default role is named 'ecsAutoScaleRole'. If you have this role, select it for use. If you do not have this role, choose the option to create the role.
.png)
Next, click the 'Add scaling policy' button and it will open up an Add Policy window. In this window, name your policy appropriately. For this exercise let's name it 'Scale-Up-Sample-WebApp-Containers'. Select the 'Use an existing Alarm' option and select the CloudWatch alarm named 'Sample-WebApp-ECS-Service-High-CPU'. The Scaling actions are where the magic happens. Service Auto Scaling can be configured to add different amounts of containers based on the value in the CloudWatch alarm. This ensures that if you experience a sudden increase in load that hammers the CPU Utilization metric, you can scale containers before the previous scaling action completes. This is very helpful for a sudden burst of traffic. Let's see the following:
.png)
We are telling the Auto Scaling to add 1 container if the value for the CPU Utilization metric is between 80% and Infinity. As we are not including the ability to add capacity to the cluster, we don't want to create another step at this time to add any more tasks, as we can only run two tasks at most in our cluster. In practice, the appropriate values of what to add in step-scaling can take some trial and error and can be assisted by proper load testing. You want to ensure that your final scaling step can provide enough to handle maximum load. However, these values will work just fine for this exercise. The result of this setup is that we will add 1 container if we exceed 80% CPU Utilization in our service.
We now need to tell ECS Service Atuo Scaling how we want to remove containers in our service as our load subsides. You have a couple of options for scaling down. One is to gradually remove containers based on your CloudWatch metric. For example, you could remove 1 container if the CPU Utilization is between 40%-50%, and then 2 if it is below 40%. However, I have found it is easier at times to simply set the number of tasks you want to run if you go below a defined metric value. In this exercise, we defined an Alarm that if our ECS Service CPU Utilization metric is below 35% we consider that to be normal and want to run only our minimum requirements (e.g. 1 task). To configure this simply add another scaling policy:
.png)
This tells the ECS Service Auto Scaling to set our desired tasks to 1 if we are below 35% CPU Utilization for the service. This takes the guesswork out of removing a certain number of instances as we simply go back to our starting point in the service. I have seen this work very well in practice and it keeps the scale down process simple.
To save your setup, click the 'Save' button in the AutoScaling window and then click the 'Update Service' button.
.png)
The Console will then show a page setting up the policies. When it finishes, view the 'sample-webapp-ecs-service'. Click the Auto-Scaling tab to see that the policies are loaded.
.png)
Check that CloudWatch is Using the ECS Service as an Action
An issue that I commonly see after the setup is that if you go to view your CloudWatch Alarms that you just created, it may provide a message that it cannot see your ECS Service:

To fix this, simply go back to the ECS Service, click the Auto Scaling tab, and then click each policy link. In this case, it would be the 'Sample-WebApp-ECS-Service-High-CPU' link on that display. This will take you back to CloudWatch and you will see that the Alarm now shows the service to scale.

Final Thoughts
At this point, we have a fully functional Application Auto-Scaling in place for the ECS Service. You can test this out by either sending load to your containers with Apache Benchmark, or you can also lower your CPU Utilization values in the CloudWatch metric to something incredibly low to trigger the scaling (e.g. set your CloudWatch Alarm to 20% CPU Utilization for Scale Up, and 10% for Scale Down). I find that this process works very well for quick tests, as it is easier to test the trigger values than with actual traffic from Apache Benchmark. If you do lower your CloudWatch metrics to test, remember to check that your ECS Service AutoScaling policies were automatically adjusted to the new values as well (e.g. 80% to 20%).
The scaling in action is shown below, which can be seen on the Events tab of the service:
.png)
You can see in the above image that once we provided load to the environment, our scaling policy added 1 task to the service and brought the running total to 2.
Scaling properly takes practice. Don't be afraid to try different policies and alarms. This is a very simple setup designed to get you started and to understand the concepts. The wonderful thing about AWS is that it is very easy to try new things. Each application and environment is different and you can easily change things to test out new ideas.
In the next entry for this series, we will look at scaling the ECS Cluster itself to provide adequate capacity for the ECS Services that are assigned to it. While we have configured the container scaling in this post, we have not ensured that we have added the appropriate number of containers from this service into the actual cluster itself. It is very possible that we cannot add containers due to the cluster not having enough capacity. This also will give us the ability to use more advanced step-scaling policies for our ECS Service (e.g. add 1 task if over 80% CPU, and 2 more tasks if over 90% CPU). This is where proper EC2 scaling is necessary and works hand in hand with ECS Service Auto Scaling. We will dive into that next time!
In the meantime, contact us if you have any questions or comments. There always seems to be more than one way to do something in AWS and I enjoy hearing how others design their solutions. Good luck.
Useful Reading:
- AWS ECS Auto Scaling (Part 1)
- AWS ECS Auto Scaling (Part 2)